Saturday, July 30, 2011

Cannoli-ventures: Please, sir, I want to go to Hoboken


For spring break this past year I once again found myself in New York and thus needed a cannoli. Julie casually informed me that the bakery where the show Cake Boss is filmed is in Hoboken, NJ which isn't too far from Manhattan. We decided to embark into the unknown world of New Jersey to find ourselves a real italian cannoli provided by the overly confident and cheesy Buddy Valastro.


There was one minor hiccup. We had no clue how to get to Hoboken.

However, that's what the helpful workers at the Port Authority are for. Thus we began asking anyone and everyone who seemed knowledgeable and found our way into Hoboken on the PATH.


It was a surprisingly windy day and I was sad to have worn such a flowy dress, but as Julie and I are prone to do, we had a small photo safari before finding the bakery.


The views of the city from across the river made a fantastic backdrop and the wind, when it behaved, gave some pretty cool effects.


Starving from our exhaustive photo taking, we wandered through the streets of Hoboken. My camera had died, but we could not stop documenting our adventure. At a walgreens we saw a case of disposable cameras that brought back so many memories of childhood, we opted to indulge in the nostalgia and document the rest of the trip with that. Be warned, picture quality decreases greatly. . .


Within a few minutes we had found Carlo's Bakery. We had also found the absurdly long line to get into Carlo's bakery.


I will do many things for a cannoli, but I will not wait in a line for 3 hours unless I will be receiving some divinely created tower of cannolis where a fountain stream of chocolate sauce drips down from the top. 

There must be another cannoli in all of Hoboken, right? So we began walking through the streets stopping in every Italian restaurant or general bakery we found. One Italian place even advertised cannolis but broke our hearts by not actually having any. They directed us to a small bakery which had many Italian cookies, but no cannolis. After trying what seemed like every bakery in town, we were lost and despondent. We saw a pizza place right near Carlo's Bakery that had some desserts. Fearing yet another rejection, I hesitantly asked the guy if they had cannolis. He nodded and mumbled some form of 'yeah' and our faces lit up with childlike joy. Julie also promptly took a picture of the man who made our dreams come true that day.


Now, this was a pizza place, so the cannoli was pretty generic. The shells were pre-made and were too crunchy so that after the first bite the cannoli had crumbled into a million pieces in your hand. The cream was at least seemingly made from scratch and was pretty good. I was proud of the guy for putting a mild amount of effort into its presentation and dusting it with powdered sugar.  Overall, even if the cannoli was a little sub-par, after walking everywhere through Hoboken it was gratifying to finally end the cannoli-venture and go back to Manhattan victorious. 

recap:
date - March 27, 2011
location - Tiny pizza place, Hoboken, NJ
company - julie
food - cannoli and slice of BBQ Chicken Pizza
review - premade shell was a disappointment, but cream was satisfactory

Saturday, July 23, 2011

No blowtorch needed


Like most college students, I have a healthy passion for lighting things on fire.
A few years ago my friend showed me fire soccer, the incredible sport you play by dousing a tennis ball in rubbing alcohol, lighting it and then kicking the ball around for a while. I've never been a huge soccer player, but this was one game I was always ready to play. 


Fireworks are great too, but they require a bit more advanced planning since unlike rubbing alcohol and a tennis ball, you cannot run into a Walgreens any time of the year and buy them. Plus, they take a lot of open space and draw lots of unwanted attention. 

This week, I decided to try another one of my favorite ways to light things on fire that remains completely contained in the kitchen. The only thing better than cake and ice cream, is cake and ice cream that is covered in meringue and lit on fire. That's right, it's time to get going with some Baked Alaska. 

I've tried making it once before, but I did it in such a hurry that I did not make the cake from scratch and used store bought ice cream. It was not very good. This time I started the day before and planned it much more thoroughly.

There are 4 main components to a Baked Alaska:
Cake
Ice Cream
Meringue
Flame
First I dealt with the Ice Cream
I refused to let my lack of ice cream maker prevent me from making my own ice cream. It is totally possible and actually quite simple so long as you are not trying to get too fancy. I chose to make a vanilla ice cream with chunks of chocolate peanut butter chip cookie dough inside. 


So I made up a half batch of cookie dough without the eggs and rolled bite sized pieces. I shoved them in the freezer for a while so they could stiffen up while I made the ice cream.


While they chilled, I got out my crappy handheld mixer and made the ice cream. I decided to make 8 small baked alaskas, so I got out my ramekins and some regular kitchen mugs and lined them with saran wrap. I divided the ice cream between the cups and let it freeze for an hour. I wanted to let the ice cream solidify a bit before adding the cookie dough so that the pieces wouldn't all sink to the bottom. I put the mugs and ramekins in the very back of my fridge and that was it


Now to make the cake...

  Since the ice cream usually melts a bit into the cake, I wanted a denser chocolate cake to go with the ice cream and to prevent the rum soaking into it too much when we lit it on fire. I found a great recipe for a dark chocolate mud cake that seemed perfect, especially since I still had so much dark belgian chocolate to use!


 It made just enough to fit into a 10 x 13in rectangular pan, which was all I needed for my mini baked alaskas.


Conquering the Meringue

I have a slight aversion to meringues because they're so particular that it is almost not worth it. But you can't light the cake on fire unless its coated in a meringue, so I worked through my apprehension and whipped up an absurd amount of egg whites. It could've gone better, but I managed to coat every cake with the nice white fluff, even if the last few got a little droopy.

Assembly


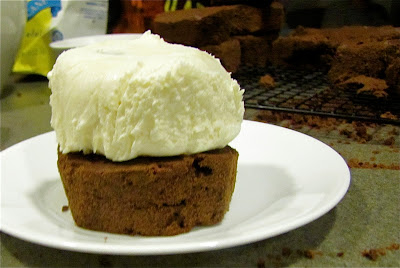
 I cut the cake into little circles the same size as the ramekins and plopped the ice cream on top. I assembled them one at a time because once the ice cream was pulled out of the freezer, I had to work quickly because this ice cream was very soft (that's what I get for not having an ice cream maker...). I had the meringue ready to go and I used a spatula and spread it all around the sides, ensuring to cover all the cake and ice cream completely.


Let the Flames Begin!

Okay, so most recipes require a kitchen blow torch to toast the meringue and "bake" the alaska. However, as you may have guessed, I do not have a blow torch lying around for these purposes. But, as we learned above with fire soccer, alcohol can help with a very low temperature flame that's easy to produce. I don't have a bottle of propane for a torch, but I did manage to get my hands on a bottle of Bacardi 151, which might as well be the same thing. I wanted to pour a ladle of flaming rum onto the cakes, but they were small for that much rum and I didn't actually have a metal ladle that would work. I tried using my Max Brenner Hug Mug, but that became problematic when the cup was englufed in flames. After a few trials, we found the most effective method was to spoon a few tablespoons of 151 onto the meringue and light it with a zippo. Then, just let the flames do their job and toast the sides of the meringue.


It didn't work as well as a blow torch, but it certainly made a great spectacle. Plus, since its an alcohol based fire there was no smoke and it was not super hot, so there were no problems with lighting it or setting off the smoke detector.
 

Once you light it, just let the flames extinguish themselves on the meringue and make sure there are no little unburned portions of 151 on the cake. It's quite a strong flavor to add to the cake if it doesn't burn off. 


 Overall I was very satisfied with both the amount of flames we got and am very thankful that all the little bits of flame that dropped onto the floor were so easy to blow out. . . 

I'd recommend trying this, but just make sure you take the time you need to make it happen, and stay safe -  keep flammable materials far, far away.


Recipes:

 Vanilla Ice Cream (without Ice Cream Maker)

2 C. Heavy Cream
1 can sweetened condensed milk
1 T. vanilla extract
add-ins

  • Beat heavy cream until stiff peaks form
  • Gently stir in sweetened condensed milk and vanilla extract. Pour into container, freeze overnight.
  • If adding cookie dough (recipe follows) or other add ins, let the ice cream harden in the freezer for about an hour and then stir them in. 


Chocolate Peanut Butter Chip Cookie dough pieces 

1 C. flour
1/3 C. cocoa powder
1/2 tsp baking soda
1/4 tsp salt
2/3 C. brown sugar
1/2 C. (1 stick) butter, softened
1 tsp vanilla extract
1/3 C. peanut butter chips

  • Cream together butter and sugar, add vanilla extract. 
  • Stir in flour, baking soda and cocoa powder, blend well. Add peanut butter chips and stir until evenly distributed. 
  • Roll into dime-sized spheres and freeze for 30-40 minutes before adding to ice cream.

Chocolate Mud Cake from Almost Bourdain

375 g (13 1/2 oz) butter, softened
1 1/3 cups (230 g / 7 7/8 oz) brown sugar
3 eggs
2 cups (300g / 10 1/2 oz) plain (all-purpose) flour, sifted
1/2 tsp baking powder
2/3 cup (80 g / 3 oz) cocoa powder, double sifted
200 g (7 oz) dark chocolate, melted
3/4 cup (180 ml / 6 fl oz) milk
  • Preheat the oven to 160C (320F).
  • Place the butter and sugar in the bowl of an electric mixer and beat for 8-10 minutes, or until the mixture is light and creamy.
  • Gradually add the eggs and beat well.
  • Fold through the flour, baking powder, cocoa and melted chocolate and stir in the milk.
  • Spoon the mixture into a 22cm (8 1/2 in) round cake tin lined with non-stick baking paper and bake for 1 1/4 hours or until cooked when tested with a skewer.
  • Cool in the tin.
  • Cut into desired shape to fit ice cream molds

Meringue
I don't feel qualified to actually provide information on meringues since I'm not proficient with them yet. So if you don't know how to do it already....


Flames

Bacardi 151 Rum
lighter

  • Spoon 2-3 T. of the rum onto the meringue, light on fire and let it burn

Cannoli-ventures: Cafe Roma in Little Italy


On my 16th birthday I brought two of my closest friends to New York with me for a weekend gallivanting around seeing shows and exploring. We went on a cannoli-venture back then, but were not forward thinking enough to fully document it all. The only remnant is this victorious picture of me finally biting into it.


Years later, one of those girls, Julie, moved to New York on her own to start working and now lives on the Upper West Side. We are both believers in taking tons of photos and are passionate about Italian desserts, so she is the perfect companion to hunt with.

Last October I spent a long weekend visiting my brother and Julie and since she had just arrived in the city, we did a lot of walking arond and seeing different areas. During an afternoon in Chinatown, we ended up in Little Italy and found an incredible looking bakery that boasted having won a cannoli competition. Needless to say we were determined to try this, but we had just eaten pounds of fried rice and noodles couldn't imagine having anything more. As difficult as it was to pass up, we decided to take our chances and try to come back another time before the weekend was through.


Two days later we spent the afternoon at Coney Island giggling like small children and strolling along the boardwalk. We hit it right at sunset and it made for some beautiful photo opportunities


And what's a trip to Coney Island without exorbitant amounts of fair food. The cotton candy was 2 for 1, okay...

We returned after dinner and somehow determined that the plethora of oil and sugar that we had eaten did not subdue our sweet tooths for the night. The long subway ride back to Manhattan convinced us that a trip to Little Italy was due.


 Also, we had sworn to go back and could not give up on this cannoli goldmine. So just as they were closing we burst into Cafe Roma on Mulberry and Broome St. and got some Tiramisu and of course the requisite cannoli.


It was just as gratifying as we anticipated and we sat as the only two people in the restaurant nibbling on our desserts as the older Italian man glared at us for asking for another glass of water.

I wish I could give a more in depth critique of the cannoli, but it was too long ago to remember the details. I do wish there had been chocolate chips on the cannoli, but the cream was probably rich enough as is. Believe me, it was tasty, and though tiramisu is a new thing for me, I thoroughly enjoyed that as well. Just writing about them is making me hungry.

This ended up being one of the easier quests, even if it did take a few days from start to finish. Victory was ours, and what a delectable victory it was.

recap:
date - October 23-25 2010
location - Cafe Roma, Mulberry and Broome st.
company - julie
food - cannoli and tiramisu
review - very tasty

Friday, July 22, 2011

Italian Herb Bread Bowls


I remember the first time I discovered a bread bowl when I was about 11. I was astonished at the ingenuity it. Not only is your bowl completely edible, but it automatically comes with bread to dip into your soup!

I think many people share this fascination and utter enjoyment. I have found that whenever I am at a restaurant offering bread bowls, most of the people I'm with, myself included, can't manage to pass it up.


 So I decided it was time to try and make my own and stop relying on restaurants to provide them. I hunted around and settled on a recipe from Mel's Kitchen for Italian Bread Bowls. I adapted it a bit and decided to add some herbs to them. Then I sprinkled sesame seeds on top to make them a bit more interesting.

I always bake late the night before I'm actually having people over, and it becomes problematic when the food smells as good as these did. The rosemary and basil came through really well and by about midnight I was ready to have one of the bowls as a bedtime snack. I was cooking dinner for 8 people so I stretched the dough a bit and made smaller bread bowls so everyone could have their own. Most people had 2 or 3 servings of the soup and just continued to nibble through the bread bowl as they ate. They were a huge hit with everyone and went beautifully both the clam chowder and the chili we had.


Italian Herb Bread Bowls

Makes 6-8 bread bowls
1 1/2 tablespoons active dry yeast (use 1 tablespoon instant yeast)
2 1/2 cups warm water
2 teaspoons salt
2 tablespoons vegetable oil
6 1/2 cups all-purpose flour
2 tsp Rosemary
1 tsp Basil
1 egg, beaten
Sesame seeds for sprinkling


  • In a large bowl (or bowl of an electric mixer), dissolve yeast in warm water. Let stand until creamy, about 10 minutes. (You can omit this step if using instant yeast.)
  • Add salt, oil and 4 cups flour to the yeast mixture; beat well. Stir in the remaining flour, 1/2 cup at a time, beating well with an electric mixer at medium speed after each addition until a soft but not sticky dough is formed. This bread bowl dough needs to be a bit firmer than a roll/bread dough so that the bread bowls rise up instead of out.
  • When the dough has pulled together, add in the herbs and turn it out onto a lightly floured surface and knead until smooth and elastic, about 6 minutes (or let knead in an electric mixer).
  • Lightly oil a large bowl, place the dough in the bowl and turn to coat with oil. Cover with a damp cloth and let rise in a warm place until doubled in volume, about 40 minutes.
  • Punch dough down, and divide into 6-8 equal portions. Shape each portion into a round ball. Place loaves on baking sheets lined with parchment paper
  •  Slash the top surface of the bread bowl several times with a sharp knife or razor, brush with egg wash and sprinkle with sesame seeds. Cover and let rise in a warm place, free from drafts, until doubled in bulk, about 35 minutes.
  • Preheat oven to 400 degrees. Bake in preheated oven for 15-18 minutes until golden brown and baked through.
  • To make into bread bowls, used a serrated knife and cut a circle in the top. Wedge a large spoon inside and pull out the top piece of the bowl.
  • Pour in some chowder, and devour mercilessly

Recipe Source: adapted from Mel's Kitchen


Wednesday, July 20, 2011

Cannoli-ventures: Taking matters into my own frying pan


Back in Oregon, there were not the same opportunities for cannolis, so one Saturday night I decided to take matters into my own hands and make some. My friend Alex was game for the challenge. I found a recipe that seemed manageable and we picked up all the necessary ingredients. To my dismay (though not surprisingly) Safeway does not stock cannoli tubes, so I had to get a bit more creative. We decided to make tubed of aluminum foil to wrap the shells around for frying and bought some metal skewers that could be bent and shoved through the foil tubes, allowing us to dip them into the oil.

Thankfully we found a thermometer to monitor the temperature of the oil. Our frying technique consisted of Alex standing over the stove and adjusting the temperature of the oil for two hours with a giant oven mitt. We jammed out to Girl Talk as he held the skewers of cannoli shells in the oil for a few minutes at a time and I rolled dough circles like a maniac. We let each shell cool a bit before removing the foil mold and managed to get only a few tiny oil burns in the process. The shells got thicker than I wanted when fried, but it they had a nice crunchy texture.

As I rolled dough and Alex deep fried it, other friends made the ricotta cheese filling. Unfortunately it turned out more liquidy than intended, but it was all we had to work with. We threw it in the fridge for a while and let the shells cool completely. Then it was game time. I filled a giant plastic bag with the filling and piped it into each of the shells as quickly as possible so that it didn't drip out too much. They needed more refridgeration still, but after an hour or so they were ready. I topped them with sprinkles and chocolate chips, and promptly devoured several.

Overall, there is a lot I would change for the next time I make cannolis (correct equipment would be a start...), but this was a fun first attempt. My team was great and though it made the kitchen we used boiling hot for hours to come, they were very accomodating. It was fun to take control of a cannoli-venture and not have to wander around for hours to find one. Though I guess this probably took a while longer, there were so many! I got to eat cannolis for days... 

recap:
date - April 12, 2010 

location - Salem, OR
company - alex
food - cannolis, lots of them
review - need work, but good enough for now


Cannoli-ventures: An Introduction

The History...

5 years ago on a fateful evening in Manhattan, I was wandering through the village with my brother and I had decided I wanted a cannoli. At the time, this did not seem like an unreasonable request. Little did we know that it would be so difficult to find a place that would sell cannolis, and even if we did, they would not be open on this particular Friday night. After an hour or so of wandering, we gave up and I got a cookie instead which, while tasty, was ultimately disappointing. 
Since this time, I have developed a true love affair with the crunchy creamy smooth and delicious dessert. It has become tradition that everytime I'm in New York, I go on a hunt for a cannoli, which I now call cannoli-ventures, because it always ends up being more of an adventure than originally anticipated. Now, on these hunts, it cannot just be any cannoli, there are rules.


The Rules:
1. Never go in alone - 
cannoli-ventures should always have at least two people.
2. Never compromise
once a cannoli-venture has commenced it must end in a cannnoli, no exceptions.
3. Never accept subpar cannolis -
EuroPan, Hot N' Crusty, and other chains of the like are unacceptable.
**exception: except in extremely desperate times in order to fulfill rule #2
4. Venture!
nowhere is too far away for a good cannoli.

So in addition to new recipes to try and sweet desserts to make, I'll also be chronicling Cannoli-ventures here. There has been a lot done in the past that I'll still put up now even if its not happening this very instant. It'll hop around a bit because after all- *every good story has a beginning, middle and an end, although not necessarily in that order. *Jean-Luc Godard


Sunday, July 17, 2011

Kahlua Chocolate Swirl Cheesecake


Contrary to the popular saying, it is often sadly true that the worst things in life are free, rather than the best. You should always be skeptical of people giving away things for 'free' and even those that are absurdly cheap, because after all, people love stuff. From collections of beer glasses stolen from various bars to the shoe closets of far too many women, it is clear that people don't love to get rid of their belongings. Sometimes people give away the dumbest things that make you wonder who is venturing out to Bethpage, NY just to pick up a build a bear outfit. These strange items are harmless but if you're not careful, these giveaways can become too addicting and before you know it you end up with 50 soiled mattresses from the local homeless shelter that would otherwise just be thrown away.

Thankfully, my new $3 springform pan is not in this category. I found it for super cheap and though I'm trying not to amass too grand a collection of belongings while I'm in Amherst lest I should have to buy another suitcase to haul it all back to New York, I could not resist this cheap buy. It might not be the highest quality, but it is functional and allows me to make cheesecakes that don't look like pies.

I wanted to make some sort of liqueur based cheesecake and settled on Kahlua. I've always had an affinity for Kahlua, even before I ever tasted it. About 8 years ago we I chose a dog from the pound, she was dark, sleek and shiny and my friend suggested the name Kahlua. I had no idea about the drink it referenced, but it sounded like a fun name, so for the first few weeks of her life, the dog was Kahlua.


However, we quickly became aware of what a ravenous creature she was as she devoured anything and everything in the house. From entire packages of cookies to remotes and bottles of medicine, there was nothing this dog wouldn't eat. My brother had decided that Doofus was a more appropriate name, which I adamantly resisted at first. Then, she chewed his cello bow to pieces, and I conceded that Doofus was most fitting.


This was proved to be even more true a few years later when we got her shaved during a hot Arizona summer. This showed off the weight she'd gained and made her look like the epitome of a Doofus...

Having a dog that looks this absurd made for a sad time for everyone in the house.


Its probably best that we ended very early on the comparison
between this silly dog and this beautiful drink. 


So I embarked on my cheesecake adventure, thrilled at the chance to use my fresh bottle of Kahlua for such a great purpose. It uses a massive quantity of cream cheese, but this recipe will serve 12 easily.

Now, I've never owned a food processor, and can count on one hand the number of times I've even operated one. 

The Modern Way
So when it came to crushing graham crackers for the crust, I went with a more tried and true method of glass cup and bowl. It vaguely resembles a mortar and pestle, but only requires the things found in a college student's kitchen.


The Student Way
The Old School Way


Just be sure that your glass cup has a flat bottom for crushing as a lip on the bottom makes it more difficult.

I have always loved cheesecake, and I can honestly say this is one of my favorite things I've ever made. It had a nice and creamy texture and the Kahlua flavor really came through nicely with the chocolate. Its no harder than any other cheesecake recipe, so give it a shot and be prepared to practice serious self restraint as you try not devour it all yourself.


Kahlua Chocolate Swirl Cheesecake

For the crust:
10 Graham Cracker sheets
1/2 cup walnuts
5 tbsp unsalted butter
2 tsp pure cocoa powder

For the filling:
32 oz (4 packages) cream cheese, softened
1/2 cup sugar
4 eggs (room temperature)
1 cup Kahlua liqueur
1 tsp pure vanilla extract
3 oz semi-sweet chocolate, melted
 
For decoration:
1/2 oz. dark chocolate

Crust:
  • Preheat oven to 350F 
  •  Crush the graham crackers and walnuts by pulsing in a food processor or smashing with a glass (see above).  
     
  • Add the butter and cocoa powder and blend until well mixed.
     
  • Line a 10" springform with parchment paper and press the mixture into the bottom of the pan
  • Bake the crust for 10 minutes, then set it aside.
 
Filling:

  • In a large bowl of a stand or hand mixer, mix the cream cheese with the sugar. 
     
  • Add the eggs, one by one, mixing quickly after each addition. 
     
  • Add 1 cup of Baileys and the vanilla extract. 
     
  • Chop the chocolate into small pieces and microwave in 30s intervals until melted, let cool

  • Separate about 1/3 of the mixture in another bowl, add the melted chocolate and whisk well. 
  • Pour the plain mixture in the prepared springform pan and top with the chocolate mixture. 
swirl around until your heart's content


  • Make a marbled design by swirling the batter with a knife.
  • Bake 10 minutes in the oven set to 350 F degrees. Reduce the heat to 250 F degrees and bake for more 60-70 minutes. The edges will be firm and the center a little jiggle, the center will firm up as it cools. 
     
  • Immediately run a thin knife around the edge to loosen it from the pan, but allow it to cool completely and then refrigerate it for at least an hour before you remove the sides of the springform pan. Serve chilled.
     
    • To decorate: use a vegetable peeler to scrape off small pieces of dark chocolate and sprinkle on top of cheesecake. 
       
      Recipe adapted from here